How to Assemble Dadant Style Frames
This past week, dad came by the house with a gift. He had watched an online tutorial on how to build Dadant style frames using a jig to speed the process up, and made one for us to use!
If you're just assembling or fixing a few frames, you probably won't use a jig, and instead can assemble them one at a time. However, if you're assembling more than 100 frames like I am, a jig comes in really handy.
A Jig will:
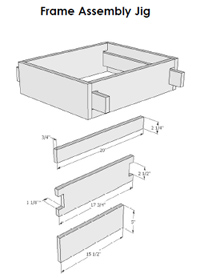
For your convenience, you can download the jig plans here.
Giving Credit Where It's Due: We found and built plans from BushkillFarms.com, who borrowed them from MyOldTools.com.
We did make a change from the plans to reduce the height of the jig. Our jig is only 4-1/4" tall instead of 5" tall. This was done because we wanted to use the jig for small frames as well as medium and deep frames, and wanted to ensure we had enough room to use a hammer/air gun for all sizes.
Once your jig is built, the process of using it to assemble frames is as follows:
Our jig has an (optional) thin layer of wax rubbed on to the inside of the jig and removable planks. It's to help prevent glue drips from sticking to the jig.
If you're just assembling or fixing a few frames, you probably won't use a jig, and instead can assemble them one at a time. However, if you're assembling more than 100 frames like I am, a jig comes in really handy.
A Jig will:
- Hold 10 frames at a time
- Keep the frames square and true
- Allow for either hammer and nail technique, or air powered nail gun
For your convenience, you can download the jig plans here.
Giving Credit Where It's Due: We found and built plans from BushkillFarms.com, who borrowed them from MyOldTools.com.
We did make a change from the plans to reduce the height of the jig. Our jig is only 4-1/4" tall instead of 5" tall. This was done because we wanted to use the jig for small frames as well as medium and deep frames, and wanted to ensure we had enough room to use a hammer/air gun for all sizes.
Once your jig is built, the process of using it to assemble frames is as follows:
- Slide the two removable planks of wood through the notches on either side of the jig.
- Slide in 10 end bars in each side of the jig. Push them all the way down as far as they will go.
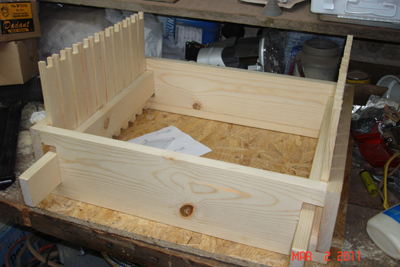
- Apply glue to each of the bottoms of the end bars. I like to use an acid brush, commonly used for plumbing work.
- Place the bottom bar into each of the 10 end bars.
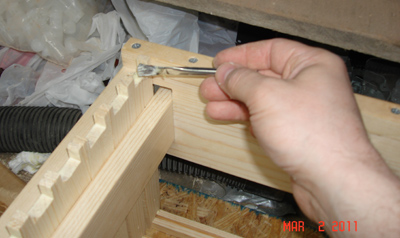
- Nail each of the end bars to their respective side bar.
- Flip the jig over.
- Glue the top of each end bar.
- Place the top bar into each of the 10 end bars.
- Nail each of the top bars to their respective side bar. I put two nails from the top, and at least one from each side (nailing the top of the side bar to the bottom of the top bar).
Wouldn't want the top bar coming loose with a frame full of heavy bees on it!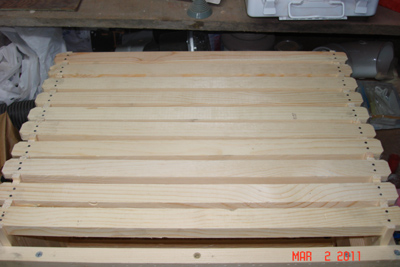
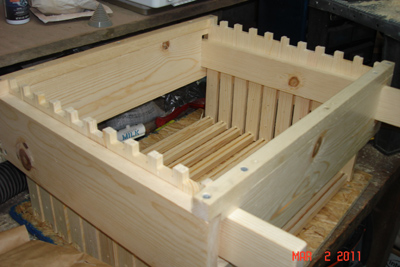
If you're only building a set of 10 frames, you can leave them in the jig to dry. The jig will help ensure they dry in a square position.
If you're making additional batches of frames, continue to step 10.
- Slide the removable planks of wood from each side of the jig.
- Carefully push/pull the frames from the jig. If you have a hive body available, hang them in the hive body to finish drying.

Our jig has an (optional) thin layer of wax rubbed on to the inside of the jig and removable planks. It's to help prevent glue drips from sticking to the jig.
Comments For This Post: (6) | Post Your Comments!
Hide The Comment Form

