Flavored Creamed Honey, Using a Raspberry Pi
I've got an article on how to Make Creamed Honey which includes my standard recipe that has worked great for years.
We've used that recipe to gift jars of Creamed Honey to our friends and family for holiday gifts over the last several years.
This year is no exception, we started a batch of Creamed Honey by following the same recipe to give as gifts, and it's currently in the mini-fridge resting at 55-57*F, controlled with a Raspberry Pi (more on that in a bit).
As we were preparing to start a second batch (to make sure we had enough to go around) we wondered about making flavored Creamed Honey such as raspberry, blueberry or strawberry.
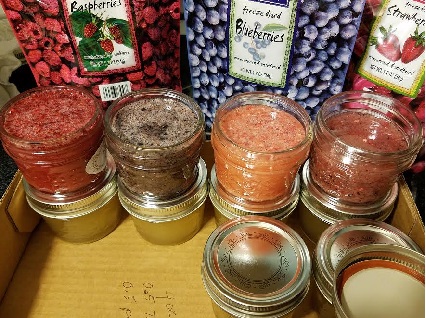
We were able to locate freeze dried raspberries, blueberries and strawberries at a local store. We used freeze dried fruit so that there would be no additional moisture added to the honey mixture, whereas fresh fruit would significantly increase the moisture content of the honey and change the crystallization process.
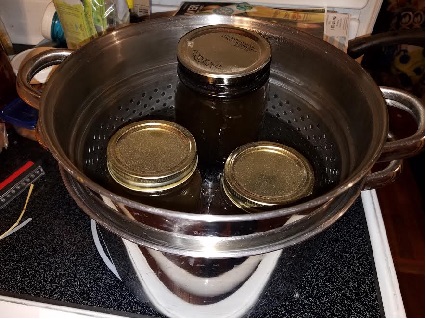
Also, I've modified the way I warm honey to remove the crystals. Instead of using a large mixing bowl haphazardly suspended over a pot of boiling water, I discovered we have a large cooking pot with an inner strainer (We use it to cook spaghetti to keep the noodles off the bottom of the pot and prevent them from burning, although I'm sure it has many other uses).
My new method is to put the jars of honey into the strainer basket and fill the pot with enough water to rise a few inches up the jars.
I turn the stove onto medium-high heat and allow it to warm the jars gently until they reach 140*F.
Once warmed we allowed the jars to cool back down below 80*F and then mixed in the flavors and Creamed Honey starter seed.
We added enough of the flavor until the color of the honey turned a nice deep color.
We added lids to the jars and then put them into the cooler to sit for two weeks. We did only 1 4 oz jar of each flavor to get a feel for how strong/weak the flavoring is.
Pictured above in order from left to right is: raspberry, blueberry, strawberry and triple berry.
Here's the recipe we used:
4 oz of Beeson Honey0.5 - 0.75 Tbsp Creamed Honey (as starter/seed)0.5 - 0.75 Tbsp Freeze Dried Fruit, ground into powder
In two weeks we'll sample it and I'll update you on how the taste, texture and recipe worked out!
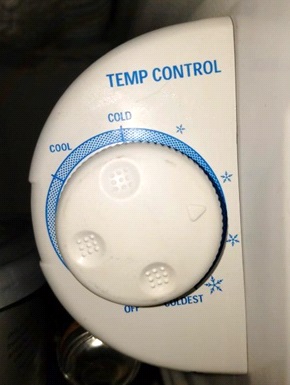
Now for those who are interested in Raspberry Pi (not the kind you can eat, that's spelled Pie), a short section on how I got my fridge to hold steady at 55-57*F.
When using an analog thermometer style fridge, I used to have to set the fridge's thermometer to 1.5 "snowflakes" and then close the door and allow the fridge to acclimate for 24 hours, open the fridge take a reading, adjust the dial and keep trying until it held at 55-57*F.
That took 2-3 days and was boring.
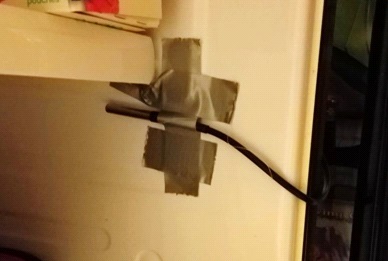
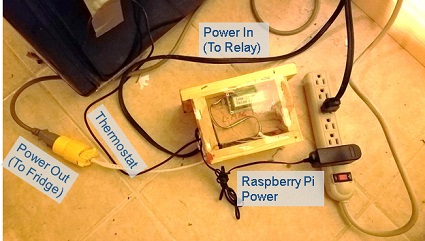
Instead, I've recently taken a learning to the Raspberry Pi, a credit card sized computer on a chip. I coupled the Pi with a stainless steel thermometer, LCD screen and 110 volt relay that I can use to precisely control the temperature of the fridge, instead of guessing what each "snowflake" on the analog dial represented.
The great thing about this project, is I didn't have to cut wires, drill holes, or modify the fridge in any way, except I unplugged it from the wall, and plugged it into the 110 volt relay attached to the Raspberry Pi's.
I was able to sneak the thermometer in the hinge of the door, the rubber gasket formed right around the wire and prevented air from moving in/out of the fridge.
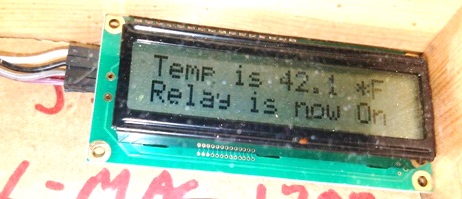
I used an LCD screen so that I could tell what the exact temperature was inside the fridge without needing to take a manual reading, and could easily tell if the relay was on/off, thus providing power (or no power) to the fridge.
In the picture below I had the temperature set lower to keep certain beverages "frosty" cold. For the Creamed Honey, I re-adjusted the temperature to a warmer range of 55-57*F.
The tutorial for how I made the setup is outside the scope of this bee blog, but for fun here's a few pictures. If you want details, scripts, links to buy your own equip, etc., feel free to email me.
See you in two weeks for a taste testing and update!
12/22/2016 Update: The flavored creamed honey has finished it's time in the fridge and is ready to consume.
We opened each jar and took a sample of each.
We really like the color profile of each, using the ratio of fruit to creamed honey above produced great looking color.
However, only the strawberry flavor was strong enough to taste, to stand out over the flavor of the clover honey we used as creamed honey starter.
I think if we had a milder (not strong clover honey) as starter, it would have been perfect.
If I made more, I would recommend to double the fruit amount in the recipe above.
I recently heard of a friend who made jalapeno creamed honey. I'll be looking for freeze dried jalapenos, and might be making an experimental batch of that next!
Comments For This Post: (3) | Post Your Comments!
Hide The Comment Form
