Build Your Own: Bee Hive Stand
I thought it might be fun to sketch out the plans for the hive stand I use and provide them here.
There are lots of different hive stand designs, and the one I'm using is a single hive stand, that stands 16" tall. 16" high seems to be high enough to prevent grass or weeds from growing under it and poking through the bottom, elevates the hive high enough to make it hard for animals like skunks to bother them (although it won't stop them from trying), and is an easier height on the back of the beekeeper working the hive.
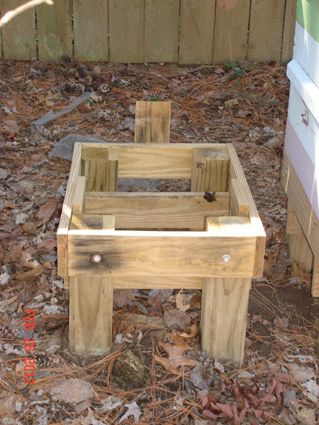
Below is a picture of one of my finished hive stands.
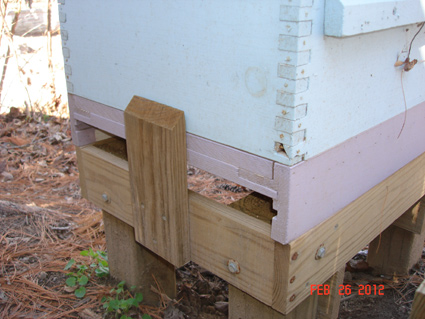
In the plans I used small pieces of wood on the back and inner sides that protrude above the platform of the stand to help stabilize the bottom board and prevent it from moving.
Below you can see the bottom board resting against the back board.
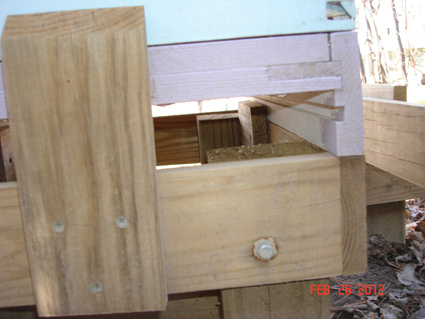
Below you can see under the bottom board from the back of the hive and view one of the side pieces preventing movement left/right. There's no need to screw the bottom board to the stand, these extra pieces of wood lock it into place nicely.
If you download a copy of the plans, you'll see my sketches of the components in a similar style to other hive plans, complete with dimensions.
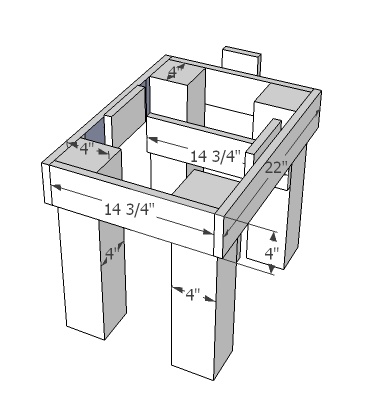
This was my first attempt at using Google SketchUp and I think I like it. I'll admit, though, that I'm not a drafting engineer, so go easy on the critiques. :)
There are lots of different hive stand designs, and the one I'm using is a single hive stand, that stands 16" tall. 16" high seems to be high enough to prevent grass or weeds from growing under it and poking through the bottom, elevates the hive high enough to make it hard for animals like skunks to bother them (although it won't stop them from trying), and is an easier height on the back of the beekeeper working the hive.
Below is a picture of one of my finished hive stands.
In the plans I used small pieces of wood on the back and inner sides that protrude above the platform of the stand to help stabilize the bottom board and prevent it from moving.
Below you can see the bottom board resting against the back board.
Below you can see under the bottom board from the back of the hive and view one of the side pieces preventing movement left/right. There's no need to screw the bottom board to the stand, these extra pieces of wood lock it into place nicely.
If you download a copy of the plans, you'll see my sketches of the components in a similar style to other hive plans, complete with dimensions.
This was my first attempt at using Google SketchUp and I think I like it. I'll admit, though, that I'm not a drafting engineer, so go easy on the critiques. :)
Comments For This Post: (12) | Post Your Comments!
Hide The Comment Form
